Friday, January 31, 2020

It is done!

I have finally finished  my living room. 
 I find the end result very pleasing and I’m very happy with colours that I chose. 
 What I wanted was a space that had no distractions other than comfort. 
I find that my choice of navy, white, and a bit of green  worked out exactly as I wanted. 
 Details: 
 The two seater sofa bed, and the large blue chair are both IKEA Ektorp.
The printed blue chair is Tullista from IKEA as well.
all three pieces were recovered with Slip-covers from
Bemz 

this company has an excellent product that is second to none.
their customer service is fantastic as well.
The green  semi shag rug was one that I had used in another room before I moved and, fit the decor perfectly.
 In all, including paint, the whole room cost me about $975.00
 White cushion with the blue palm fronds 
Was printed and made by me.
 All through  the the years I have collected small white jugs and 
Creamers.
 Set of three enamel jugs are from IKEA 
I bought them a long time ago loving the shape and style of them.
 The opposing shelves on either wall art as well from IKEA. 
I purchased then used for about 1/10 of the cost had they been new.
 They were originally the dark brown black, so I sanded them down 
painted them, And used brackets to mount them.
.


Thursday, June 14, 2018

I have been away

I have been very remiss in painting and posting to this site, and I apologise.
I moved into Town and to a much larger home and have been so busy getting it all organized that my Art has fallen by the wayside.
As well, I have been going through a "Dry Period" a condition that many artists can relate to.
This does not worry me, as when "It" strikes I will be ready once more to put paint on Canvas and take off once more.
My living accommodations are perfect, I am in a quiet well treed area that has multiple types of Family homes.
I as well, now have a balcony which is something I missed so much in my old residence.

I have been decorating up a storm. Another Art form to be sure, and a slow one at that
(Something that takes a lot of patience for an impatient woman)
So, here is my progress.
The next two photos are my inspiration for the Living room.
I loved the Navy Blue of the first and the 
Classic Blue and white Minimalistic of the simple white of the furniture. 


The painting begins
edging.
(we all know how fun that is)


Finished wall, baseboards to follow


Coffee table I purchased through Verage Sale
 for $15.00
Solid wood and real heavy!
I sanded it down and painted it the same colour as the wall.


My lamp....
I fell in love with this lamp years ago.
it was in the back room of a literal Junk shop.
I loved the shape and form of it and have dragged it around with me forever, 
or so it seemed.
Finally it will have a place of honour in my Living Room.
it was a sick beige and the shade was in terrible shape.
But to recover / replace the shade professionally would have cost me 
on the upwards of $150.00
so I searched and luckily on Pinterest I read about
"Styrene adhesive"
yep, the transparent plastic that covers shades is called just that!
on line I went looking for local businesses that either sold Styrene or recovered lamps.
I got lucky.
and purchased 2M. of said styrene and will do the shade at a later time after all the painting is done.


The chair,
I have an IKEA barrel chair, it is a well made piece of 
furniture that I like sitting in as I rarely slouch when sitting.
I wanted to re-cover it and found a site on-line called 
"Bemz"
https://bemz.com/?gclid=EAIaIQobChMIoouShejT2wIVD6vsCh1hGgIjEAAYASAAEgLJQPD_BwE
While searching Bemz's site I came across a Designers Guild,  Christian Lacroix fabric called
Exo-chic Medetranee
and promptly fell in love.
To complicate things further, I ordered the cover for the chair
(after a great deal of saving, LOL)
long before I had seen my two inspirational photos above.
Little did I know back then that this chair and those two magazine photos were to lead the way
to what I am now working on almost 18 months later.

So in a very non-professional way, my new home is coming together.
as an artist I have to admit that my favorite colour is green.
Navy Blue never entered my mind one bit!
I like the peacefulness that this blue gives me.
I love the minimalist intrusion that this style is extending to me.
by the end of the Summer I should be done.
I will use a green as an accent colour in a very small amount.
one cushion that I found suits this perfectly
 The green

The cushion

The other three walls will be a pure white. and they will have floating shelves 
that are painted in the opposite walls blue as a contrast.
And hopefully Before September I will have it all done!
The view from my balcony will bring in the green
and during the Winter, the white from the snow will do the same.


Be well everyone. "Later.....
t.

Sunday, May 1, 2016

"Joy!"

"JOY!"
Acrylics and Mixed Medium
Birch Panel
24" X 24"
(SOLD)
 

This painting began (again) with a prepared background 
that I had composed quite a while back.
As I said earlier, I do Backgrounds  and set them aside until the right idea comes to mind 
for what I have to work with.
I realize this seems to be a slap-hazard way of creating any type of art, but it works for me.
(What can I say?)
When I thought of a whale breaching in the Ocean 
In my Minds eye I was picturing joy and freedom.

Firstly I set out deciding the positioning of the Whale
and what part of the Breech I would portray.
I drew a small sketch
(Yes, believe it or not I have now drawn a Bird a Fish and a Whale )
I knew (again) that I wanted to portray water and an immense span of it.
So I set up the boundaries of the level of the water.
(the white goop shown below)
and
 that determined the positioning of my main focus.
I poured the Liquitex pouring medium just below the top 1/2 of the board and it did not pass my barrier (thankfully)
I (at this point) just had one line of pouring medium
(as shown in the below photo)
Again, please understand that I am working by the seat of my pants here.
 I do not know any tried and true way to do this so I improvised with what I had on hand.
And luckily for me, it worked.
 I then penciled in the Whale with a water colour pencil and painted it in.
above and below what was now the water line
Close-up of painted water/wavesThis photo shows how the Pouring medium makes the water realistic as in a splash!
 
Detail
I hope this kinda gets you all into trying new techniques and products.
Yes, I know Pouring medium is not a new product, but it was to me.
I love working with new ideas and methods.
Yes I fail at them as well, but it sure is fun  trying.
Sometimes it is well worth trying to use a new art product without really knowing what it can do.
I knew that Pouring medium dried crystal clear and looks like glass.
With this work I used the medium in layers letting one level completely dry before adding another.
I wanted the water to look and feel like actual waves.
I think I achieved what I set out to do!
Later everyone
~~Kathleen

Friday, April 29, 2016

"Ocean,Kelp,Sky"

"Ocean, Kelp, Sky"
Acrylics and mixed medium
on Birch Panel
24" X 24"

I started experimenting with mixtures of Blues on a Birch Panel a while back.
The beauty of this method is that one never knows what the actual end result will look like.
You end up with what the paint gives you.

on this one I applied Gold leaf across one side on an diagonal
Let the whole thing dry, placed it on the shelf.
I then promptly forgot about it
until the other day.

While flipping through the Rack
I came across this one and thought
"Would a fish ever look great on this!
so I penciled in a fish.


I was at complete odds with myself as to how I would paint in a fish 
so it would look  like it was in actual water.
Not as if it had been applied atop the already prepared  background.
As a mixed media Artist, I collect things.
I collect a lot of things
and 
like a Raven or a Magpie, I especially love shiny things.
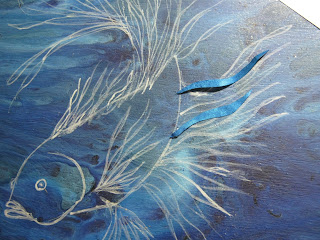
yep, Blue foil.
I then got the insane idea that I would cut out individually each strip of foil 
and compose the flowing fins as individual pieces.
Affix them to the background and have wonderful movement.

And I set out.
three days later I had a reasonable looking  Beta Fish
that actually had movement.
The next photo show the progress of this endeavor!

When the Fish was done I taped off the board following the Gold leaf
and
poured Liquitex pouring medium on the blocked off area.
You don't want to know how long it took the medium to dry.
You can see in the photo below 
on the upper Left corner how the area is now like Glass.
(reflection)

 I then  (again )waited for it to dry more.

after the Pouring medium was totally dry I rubbed a deeper blue over the Gold leaf
(Blue and yellow make green)
and had my kelp
the top right hand corner is a matte finish as opposed to the Glass like bottom with the Kelp as a separator
a rather poor detail of the beta Fish.


Saturday, April 2, 2016

"Seasons"

"Seasons"
(Taken at an angle to show the varied sheens)
16" X 20"
Acrylics and Mixed media
on Canvas
Recently I had the pleasure of being gifted trial sizes 
of 
Liquitex products.
among these were two trial sizes of
spray paint.
so, of course I had to try them.
I had begun a canvas with tree trunks , 
intending to let my imagination run with whatever happened.
What better than Leaves?

This was the Partially finished canvas I started with.
Birch tree trunks atop Gold and Copper Metal leaf.
Obviously, this was not anywhere complete,
and
for some reason I just didn't tune into what I had.
Stuff was sorely missing on this canvas.

 So, I grabbed one of my Stencils and started out with the Gold paint
then added leaves of Silver on top of  them.
and the shape and form began.
I notice that I had left a serious gap in the middle of the canvas
So I added more Gold & Silver leaves in the middle,
toned down some more  of the Metallic paint
by washing the canvas with a very light leaf green
and scrubbed it off,
I then faded some of the leaves in and out.
The Seasons of the year fade in and out with grace.
and so do the leaves on the trees.
I wanted the leaves to look like some were emerging and some were fading away.
and ended up with this;
I like the Liquetex Metallic sprays, you can paint Acrylics over them.
(Something that is next to impossible with other Metallic Spray paint.)
I will always hold the actual  Gold and Silver Leaf dear to my heart.
I love working with leaf.
That said, the effects of these sprays is great!
They are almost too bright (Shiny) for my liking, 
but that can always be toned down 
with an overlay of acrylic wash or paint.
I hope you enjoy this painting
and how it came about.
It was fun experimenting with new products.
~~Kathleen

Friday, February 26, 2016

 "The River"
Acrylics & Mixed Media
On
Canvas
12" X 18"

It is not often that a person can create a work of Art 
on a canvas that looks like a painting
but is not one.
This work was composed entirely without brush work.
The sizing used to affix the Gold,Variegated,
 and Silver leaf was painted on by brush.
That put an end to the actual use of any brushes.

The background on the Canvas was painted a Matte Black.
I applied Goldens Light Molding Paste to form ridges that would represent
 tree trunks 
on the Upper right 1/3 of the Canvas.
I did the same to the lower left to denote bushes.
Then I  I randomly laid down the leaf in a rough
pattern
and left it to dry.
At this stage I had not used the Copper leaf yet.
 You can see the black areas where, after the leaf had dried fully,
 I had taken a very stiff brush and scumbled areas of it to distress the Leaf.

That was it for this part of the background.
Once the base was dry I poured Goldens Green gold
atop parts of the leaf, let it sit for 20 minutes and started buffing it off.
leaving the  shiny leaf with a green undertone.
Next,
I decided where I wanted the water to be.
 I  painted sizing where I wanted the copper strips to be.
(I did not take a photo of this step, so the one above is just after I started defining the trees.)
Once the Copper Leaf dried, I then painted sizing in between the copper
and 
randomly affixed Gold and Silver leaf slivers randomly.
This gave the "Water" a visual  flowing movement.
My next step was to decide where I wanted trees to go on both sides of the River banks.
I dropped small splotches of Jenkins Green paint where I thought trees would be most pleasing and then formed them with Saran wrap.
This is a method that I learned a long time ago and I still use it a lot for shaping abstract trees on my Art.
Laying the wrap on the wet paint and manipulating it to form groves and branches is very effective. and once dried  leaves a very pleasing effect.
You can see on the tall lower tree on the right
The the detail is achieved by laying the wrap on the paint,
and  pinching the Saran wrap over the over it.
The darker lines are where the paint goes into the creases of the wrap
and are very defined when they dry.
Example 1

Example 2

The end result depends so very much on how the initial laying of the Leaf ends up,
and
what a person "Sees" in a work.

I saw, from the very beginning that this would be a landscape 
and have water running through the middle of it.

Here are a couple of close-ups of the work
this shows the Molding paste formed ridges to shape the trees.
this is a detail of the layers on the river.
You can see as well, how the Manipulated paint works with the wrap.
If you have any questions on working with this method (Saran or Cling wrap)
please comment below or send me an email.
Hope you like it

~~Kathleen

Thursday, February 18, 2016

"Larches in the Rain on a Late Autumn day"
16" X 18"
Acrylics & mixed media on canvas


I love Larches.
They are tough as nails, capable of almost bending in 1/2 during a wind storm,
and
straightening right up once the wind has passed.
Beautiful green, and Spruce like.
They have needles that turn gold in the Autumn and drop before the Winter sets in.
(Unlike Spruce and Pines.)
My children are fortunate enough to have a shelter-belt of Larches fronting their property.

Larches in  Canada are also called"  Tamarack"
'Tamarack' is from the Algonquin word 'akemantak' which means "wood used for snowshoes".
        Historically, tamarack was widely used in wooden ships, for timbers, planking and to join ribs to deck timbers. Native Americans used the roots to bind seams of birch bark canoes, the wood for arrow shafts and the bark medicinally.
http://www.larchwoodcanada.com/what_is_a_larch_tree

They have a "Special" feel and look.
They are quite unique in that they are
deciduous.
Most coniferous trees are evergreens, but some deciduous trees are evergreens as well. Evergreen trees keep their leaves in all seasons, lose them gradually as the weather cools
 The needles on a Larch are never quite as stiff as on an Evergreen.

This painting is  done on a base covered  randomly with molding paste to denote trunks .
It is over painted and the trees emerge.
 The photo below highlights the ridges of the paste after painting.
I hope you like this.
I kinda do!
~~Kathleen


Monday, February 15, 2016

"Fourteen Trees on a River Walk"

Acrylics on Canvas
12" X 12"
(SOLD)
An exercise in light where you have a daytime painting with no sun!
No sun means no obvious shadows, not an easy task.
But with variances in colours (blue & white only)
I did it!
Actually in this painting I have used only three colours.
Phthalo blue (Green Shade)
White  & Paynes gray

Saturday, February 13, 2016

"There is always Love"

HAPPY VALENTINES DAY EVERYONE.

I have been working on this pair for a while now.
I am very pleased with how they turned out.
A very different style from what I usually do!
"Tryst"
12' X 12" AND 12" X 14"
ACRYLICS AND MIXED MEDIUM
On canvas.
"SOLD"


This pair is unusual as the background of both paintings is very 

defined and not smooth.
I chose to place the shiny gels atop a Matte painted canvas for contrast.
The end result 

is
striking.
(A real statement of love)


Side by side
~~Kathleen
All comments welcome.


Friday, January 15, 2016

"How on Earth was that done?"


"The Beginning"
Acrylics And Mixed media
Birch Panel
24" X 24"

Today's entry is not about my art.
It is how the art forms of others make me better at what I do.
It is about the wonder that surrounds those of us 
that ask
"How on Earth was that done?"

A lovely friend of mine is an author.
She is dedicated to her work and has worked 
(sometimes agonizingly)
passionately on her manuscripts.
Through her, I have learned that if we do not take time
 to appreciate the intensely dedicated work of others to complete a project,
we will fail to complete the roles we have assigned ourselves in any good fashion.

For any Artist, be you a Baker, a Shoemaker, a Nurse, a Teacher, or an Author,
unless you realize and appreciate the trials and tribulations
 of others creations, craft, or profession,
you cannot appreciate the fabulous standards your own works have to live up to.

The people surrounding us (often unknowingly) are all artisans in their own right.

I put paint and other mediums on a canvas.
when I am finished one I am either pleased with the work 
or
 so dissatisfied that I will completely change it, 
or  junk it and begin anew.
Without the proper tools we use to craft in our chosen profession
we are left floating in nothingness.
Sometimes the proper tools are what we see
when we look at other people going about their daily life
 and completing certain tasks.

Everything we do goes way back in time to when someone said,
"I have an idea on how to make this work, 
I will craft it and share it with others,
 so they can utilize it and create something new with it."
We, in turn use the tool, improve on it, 
and often turn it into 
 something totally different.

I cannot tell you how many times that the end result of an  Art-work
 that I present to the public is a totally different concept from what I had in mind at the beginning.

Authors revise, edit, revise and edit more.
Nurses  & Teachers are constantly improving on their profession.

Everything changes constantly
and
if we do not stop and ask
"How did that ever get done?"
The true meaning of  the tools we use in our everyday lives
are useless,
and what we do becomes meaningless.
~~Kathleen

Thursday, January 7, 2016

Wasted Leaves, Resurrected"

"Wasted Leaves, Resurrected"


Acrylics/mixed medium
Birch Panel
24" X 24"

The other day, while taking out the garbage, I tripped over something in the snow.
I used my foot and uncovered the object.
I was saddened to see a part of a book.
Looks like someone, for whatever reason, tore the pages out of binding
and
ripped it into sections..
I had tripped over one of the sections.
The pages were in reasonable shape, it was too cold for any moisture to 
damage the leaves.
I picked it up kinda slapped it against my leg to knock the snow off what was left.

Such a waste.
The beautiful words inside were lost ,
The binding was lost, a tree was lost.
Nothing good would come of it ever again.

I took it inside with me, lay it on my work desk and let it dry for a couple of days.
All the time wondering how I could do something to
make it better.
A hopeless task to be sure.
I love books.
 They were my constant companions when I was young,
And all throughout my youth. 
They were my refuge.

I owe Books so much.
 As, who I became, how I acted, and what I knew,
 came from reading books.
When the pages were dry, somewhat stiff and marked,
I saw them as an artwork desecrated, and incomplete.

The idea for this work of art formed slowly in my mind 
and
Kind of came together on its own.
I was saving some of the pages, and reforming them.
I gave them life with colour.

This work of art emerged slowly.
I documented my progress and present it to you here.
I hope you like it.
I have saved the rest of the unused pages.
For another time, another use.
All is not lost, and in my mind,
I paid homage to a once beautiful book.
and helped it become something incredible again.

~~Kathleen

 The cut outs from the pages in the first application of colour.


Final paint and the leaves drying.

Detail of the words on the Leaves


Rough arrangement of the leaves

Glueing each leaf down

Drying after the top glaze is done

~~